Documentation
Aploxn - Business Consulting WordPress Theme
Thank you for purchasing our theme, now you are an owner of a regular license or extended license of Aploxn WordPress Theme. You are entitled to get free lifetime updates to this product + exceptional support from the author directly.
This documentation is to help you regarding each step of customization. Please go through the documentation carefully to understand how this Theme is made and how to edit this properly. You may learn basics here.
Aploxn is a WordPress for Business Consultancy purposes. This theme is made with the thought of modern age demand. The advantages you will get by using this template is you can use it in a multipurpose way like Business Consultancy, HR & Management Consultancy, Marketing Consultancy, Financial & Economics Advisors and many more purposes. It has 6 different styles of Demos with the inclusion of 25+ very well organized inner pages with different styles of the main features. It has made with the Elementor Page Builder so easily anyone can customize it by Drag and Drop. It is compatible for all browsers and fully responsive so very much suitable for any devices.
- Item Name: Aploxn - Business Consulting WordPress Theme
- Author: EgensLab
- Created: 2 January, 2024
- Version: 1.0
If you have any questions that are beyond the scope of this help file, Please feel free to email via Item Support Page.
Getting Started
To install this theme you must have a working version of WordPress already installed.
- For information in regard to installing the WordPress Platform, please see the WordPress Codex: Installing WordPress
- Before to start working with your new theme, make sure that your WordPress Version is updated to the latest one.
- You can know more about WordPress Requirements from here.
Server Requirements
Please make sure you have fullfilled the following Requirements
- WordPress 5.8 or higher version.
- PHP Version 7.4.0 or Upper . ( 8.0 recommended )
- MySQL 5.6 or greater.
It is also recommended to setup your php limit to avoid the common issues during the plugin installation and demo import.
- memory_limit 128M
- max_execution_time 180
- post_max_size 64M
- upload_max_filesize 64M
- max_input_time = 120
- max_input_vars = 10000
Knowledge Base
Firstly you need to install WordPress on your server using softaculas or other installer. It depends on your hosting provider.
Here are some usefull links to get started with WordPress:
- Official instruction of installing WordPress on your server- WordPress Installation
- Here is the official guide to get started with WordPress- Getting Started
What's Included in the zip folder
- A zip file of the theme .
- A plugin zip file for core functionality.
Installation
Follow the steps below to setup your WordPress theme.
There are two methods to install the Aploxn WordPress Theme. The first one is using the WordPress Theme Installer and the second is installing it using the FTP method.
WordPress Theme Installer
- Login into the WordPress Dashboard and search for Appearance -> Themes.
- Click "Add New" at the top of the page.
- Now click on "Upload Theme".
- Choose the zip file you will find within the whole package you downloaded from Themeforest -> "aploxn.zip"
- Once the installation is complete you can Activate the Aploxn WordPress Theme
FTP Upload Method
- Using your FTP client, login to your server via FTP and navigate to "wp-content/themes" under your website's root directory.
- Here you must place the main folder you will find within the whole package you downloaded from Themeforest, this folder called "aploxn" ( unzipped version ).
- Once your files are completely uploaded to your server, log into the WordPress Dashboard and go to "Appearance -> Themes" .
- Search the Aploxn WordPress Theme Screenshot and click to "Activate".
Theme Installation Tutorial
Screenshot Of whole Process to Install Theme
Choose the zip file what you will find within the whole package you downloaded from Themeforest -> "aploxn.zip"
.png)
Now, Click Activate to activate the theme
.png)
Plugin Installation
When the theme is uploaded You need to install some recommended plugins.
Click Begin Installing Plugin.
.png)
Now, Select all the plugin to install
.png)
Now, Select Install then Click Apply button
.png)
After installing all plugins Click Return to Required Plugins Installer
.jpg)
Now, Select Activate then Click Apply for activating all plugins
.jpg)
One Click Demo Import
Set Front Page and Posts Page
You can easily import demo data using our one-click demo content importer. View our screenshot to the demo import page.
.png)
Now Click Import Demo Data
.png)
Now, Click Continue & Import
.png)
Congrats! Your site is ready..
After import completed successfully, click visit site
.png)
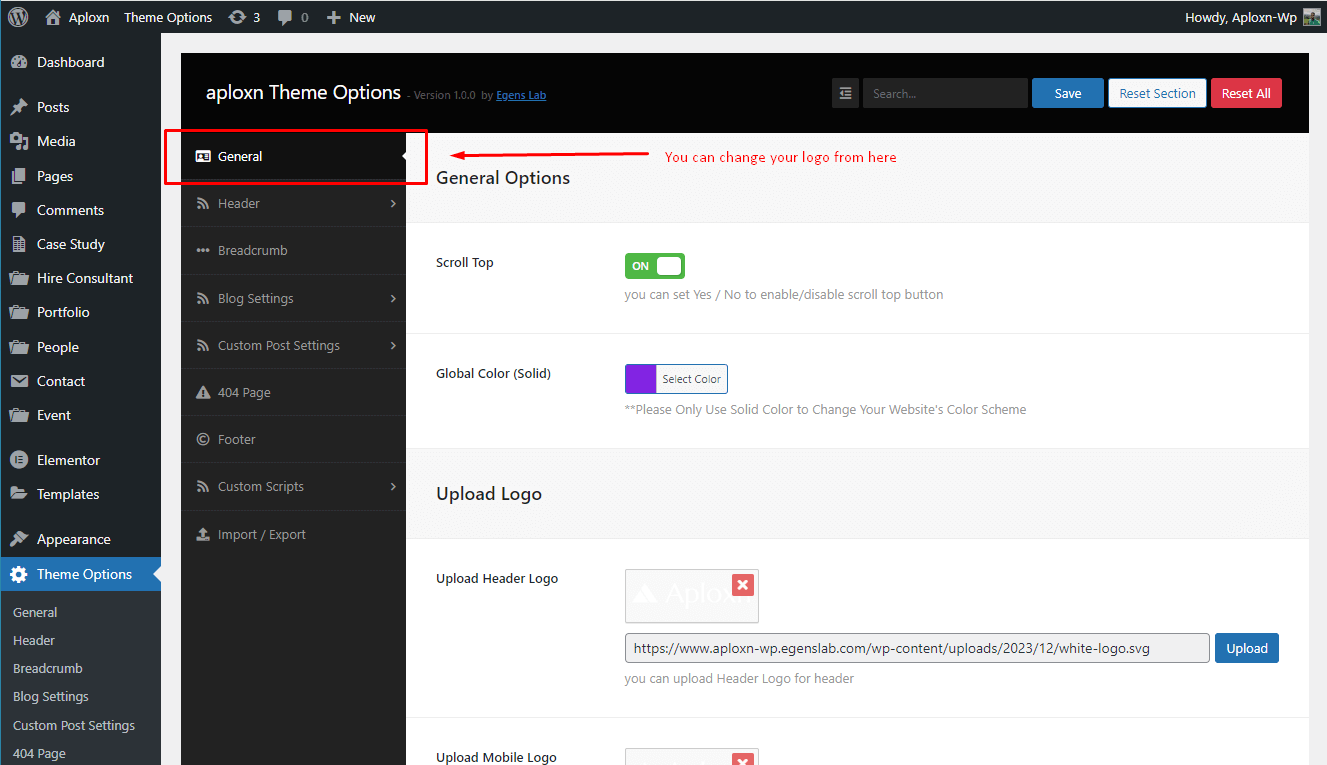
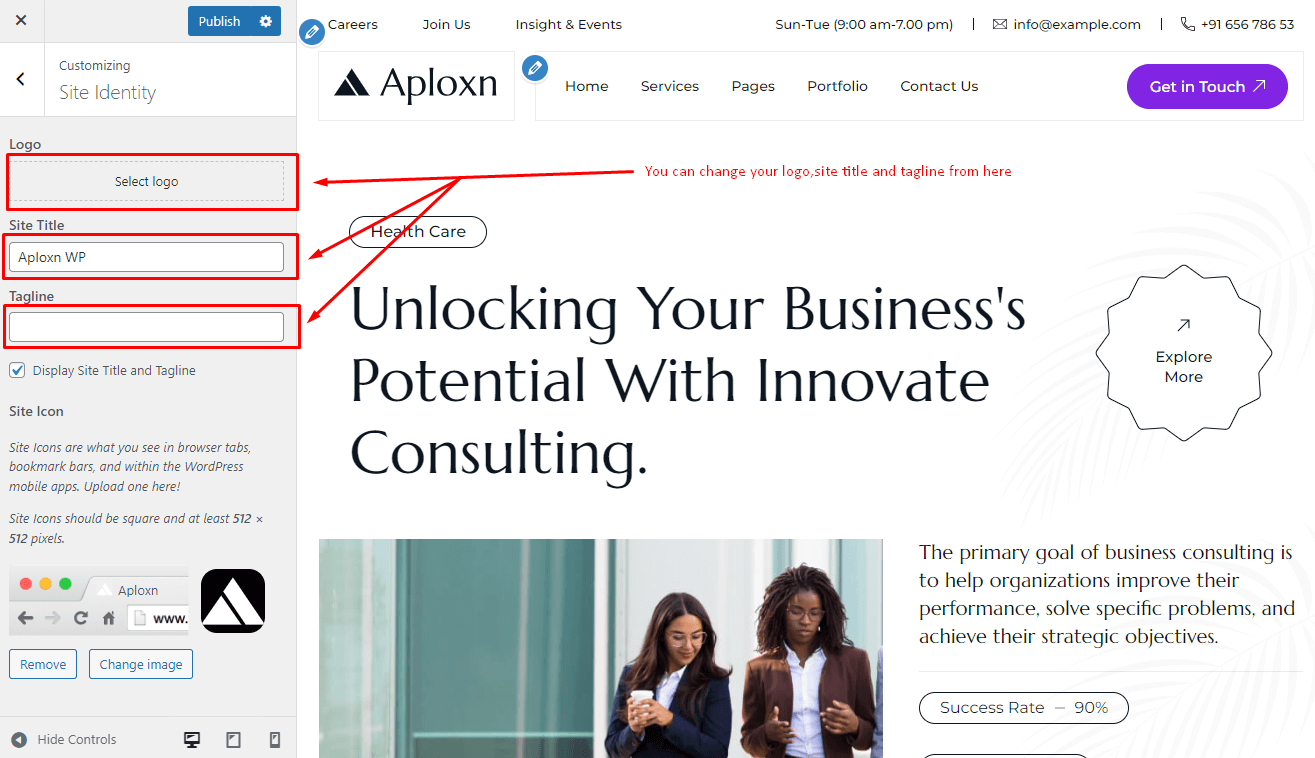
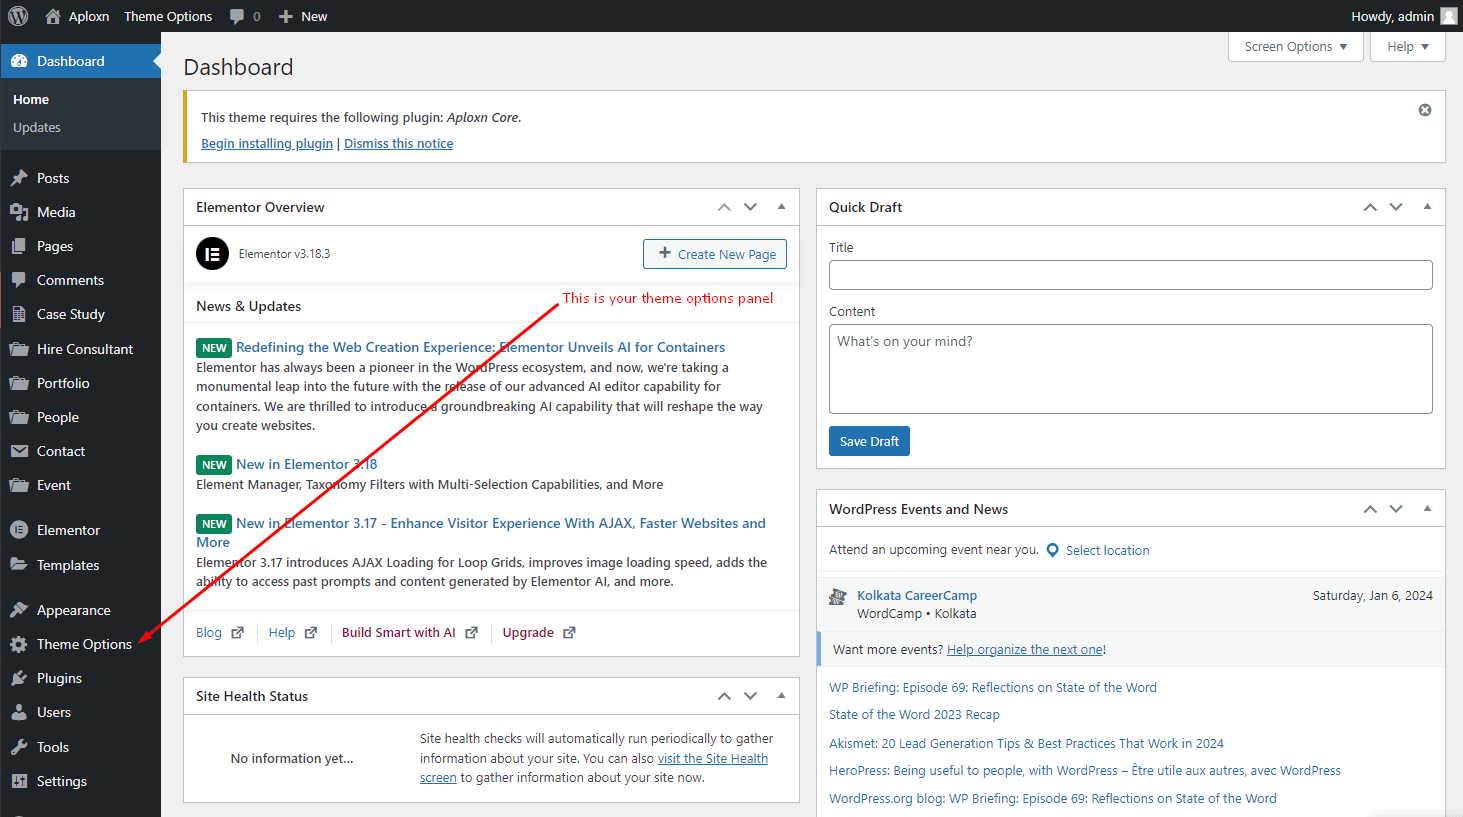
Changing Logo & Page Title
You can manage some special Settings from Aploxn theme customizer easily. And the other Settings will be found in the theme option panel.
You can change your Theme Logo from theme options panel
Now, Click on Customize for other options
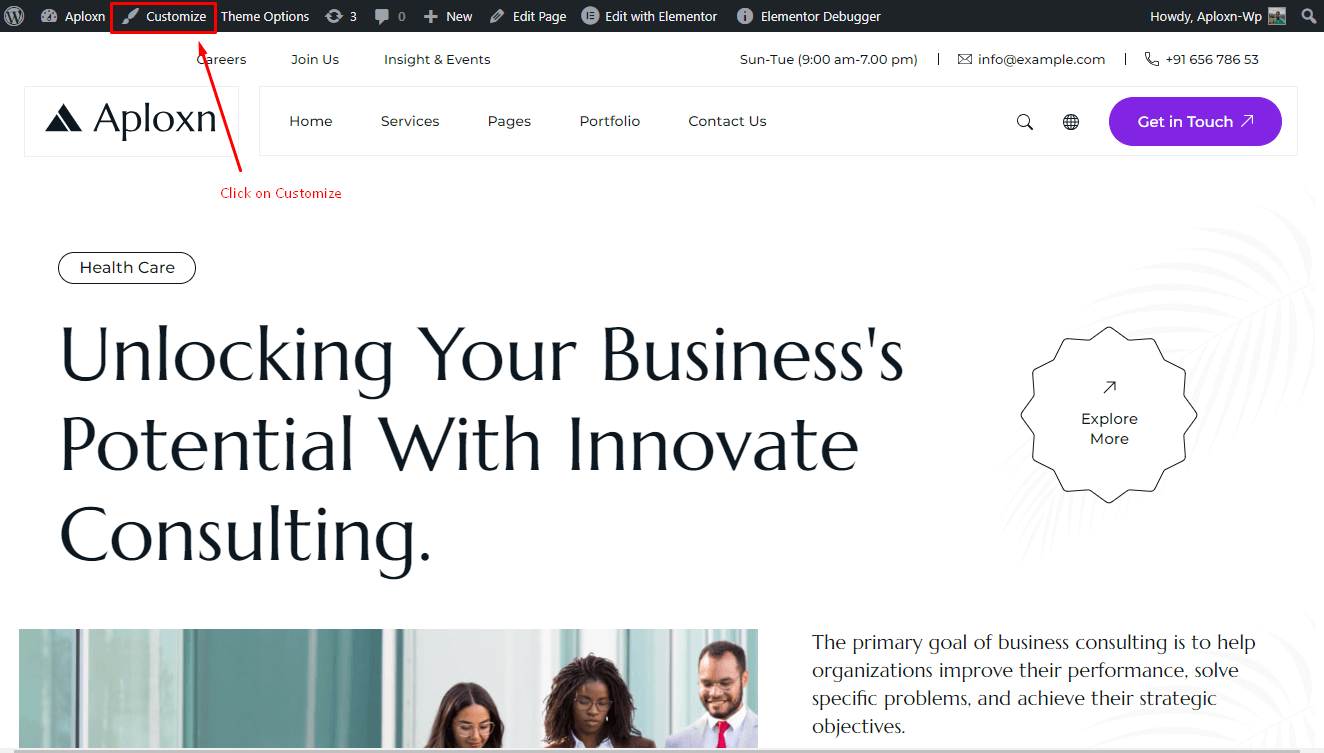
These options are for Theme Logo, Site Title and Tagline.
Setting up the Menu
The final step before you can start with the new theme is to create your menu, it will be really easy. If you import our demo data it will automatically make a menu for you and set it a primary location.
Let's make your own menu.
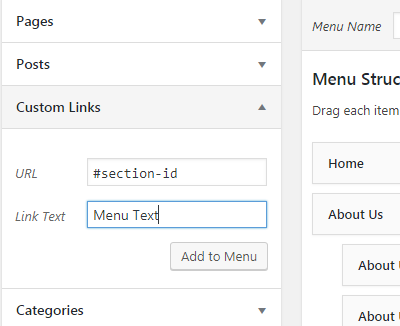
Go to "Appearance -> Menus" and you will see a panel where you can create new menus. Create one, add your created pages to it and save it. After this in "Menu Settings" below the menu select"Header Menu" and hit "Save Menu".
For One Page Menu you need to use custom links option to make one page menu. Put your section ID in the URL field and menu text goes Link Text field. Then hit Add to Menu Button.
Note: You can use up to two levels of navigation in this theme.
The Customizar
After activating the theme, you will notice that a new submenu item appeared, under "Appearance -> Customize".
If you click on it you will be taken to the WordPress customizer, a tool which will allow you to modify the look and feel of your website.
Unfortunately not all theme options features are present. You can select only the body background color, background image, custom header image, logo & favicon.
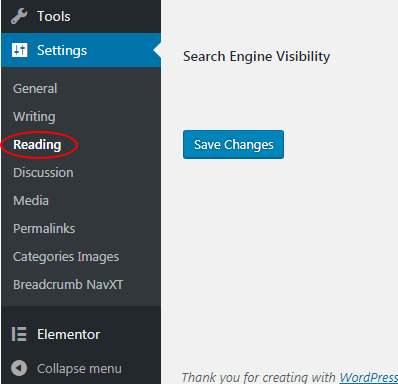
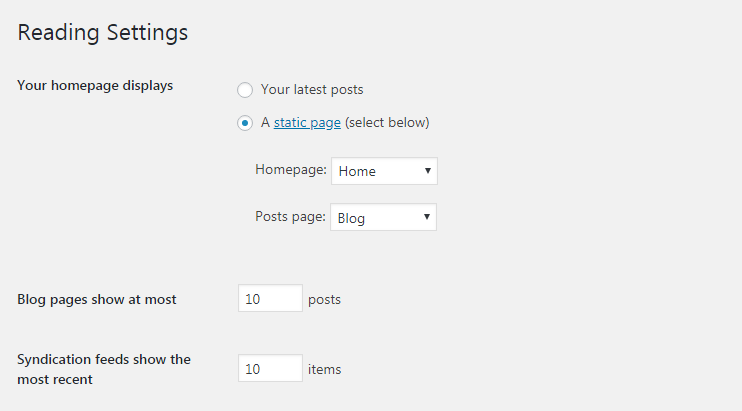
Set Homepage and Blogs
- Login to WordPress admin panel (URL should be
www.yourdomain.com/wp-admin) - Navigate to
"Settings > Reading". - From dropdown, select which page you want to set as
"Front Page"and which page you want as“blog posts”page. Default Front Page is‘Home’and default posts page is‘Blog’.. - Click on ‘Save Changes’ button to save all.
Creating A New Page
Step 1: Navigate the Add New menu under the Pages Navigation.
Step 2: Select your header style and Give it a title.
Step 3: Use Elementor for your page Customization.
Elementor Page Builder
Now you can customize the page with elementor page builder.
Contact Form 7
Contact form 7 is used to create ‘easy to handle’ and ‘easy to customize’ forms. Aploxn theme has a pre-built forms. To get all forms, ‘Contact Form 7’ plugin must be installed and activated. You can add/edit/delete the contact form by following this documentation
https://contactform7.com/getting-started-with-contact-form-7/
Contact Form
                <div class="contact-form-area two">
                <div class="row">
                    <div class="col-lg-6 mb-30">
                        <div class="form-inner">
                            <label>Name* </label>
                           [text* name-65 placeholder "Daniel Scoot"]
                        </div>
                    </div>
                    <div class="col-lg-6 mb-30">
                        <div class="form-inner">
                            <label>Work Email* </label>
                           [email* email-82 placeholder "[email protected]"]
                        </div>
                    </div>
                    <div class="col-lg-6 mb-30">
                        <div class="form-inner">
                            <label>Company Name* </label>
                           [text* company placeholder "Consult Pro"]
                        </div>
                    </div>
                    <div class="col-lg-6 mb-30">
                        <div class="form-inner">
                            <label>Consulting Area* </label>
                           [text* consulting placeholder "Dealership"]
                        </div>
                    </div>
                    <div class="col-lg-12 mb-15">
                        <div class="form-inner">
                            <label>Write Your Massage* </label>
                           [textarea* message placeholder "What’s on your mind"]
                        </div>
                    </div>
                    <div class="col-lg-12 mb-50">
                        <div class="form-check">
                            <input class="form-check-input" type="checkbox" value="" id="contactCheck">
                            <label class="form-check-label" for="contactCheck">
                               Please save my name, email address for the next time I message with aploxn.
                            </label>
                        </div>
                    </div>
                    <div class="col-lg-12">
                        <div class="form-inner">
                            <button class="primary-btn1 btn-hover" type="submit">
                               Submit Now
                                <svg xmlns="http://www.w3.org/2000/svg" width="12" height="12" viewBox="0 0 12 12">
                                    <path fill-rule="evenodd" clip-rule="evenodd" d="M10.1865 1.06237L0 11.2484L0.751627 12L10.9376 1.81347V8.85645H12V0H3.14355V1.06237H10.1865Z"> </path>
                                </svg>
                                <span> </span>
                            </button>
                        </div>
                    </div>
                </div>
            </div>
Contact Form 1
                <label> Your name
                [text* your-name autocomplete:name] </label>

            <label> Your email
                [email* your-email autocomplete:email] </label>

            <label> Subject
                [text* your-subject] </label>

            <label> Your message (optional)
                [textarea your-message] </label>

            [submit "Submit"]
Apply Position
                <div class="row">
                <div class="col-lg-6 mb-25">
                    <div class="form-inner">
                        <label>First Name</label>
                        [text* fname-119 placeholder "Daniel"]
                    </div>
                </div>
                <div class="col-lg-6 mb-25">
                    <div class="form-inner">
                        <label>Last Name</label>
                        [text* lname-119 placeholder "Scoot"]
                    </div>
                </div>
                <div class="col-lg-6 mb-25">
                    <div class="form-inner">
                        <label>Your Email*</label>
                        [email* email-62 placeholder "[email protected]"]
                    </div>
                </div>
                <div class="col-lg-6 mb-25">
                    <div class="form-inner">
                        <label>Phone Number</label>
                        [text* number-119 placeholder "+920- 5566 **** ****"]
                    </div>
                </div>
                <div class="col-lg-12 mb-25">
                    <div class="form-inner">
                        <label>Cover Letter*</label>
                        [textarea* coverletter placeholder "Write cover letter"]
                    </div>
                </div>
                <div class="col-lg-12 mb-20">
                    <div class="upload-file-area">
                        <div class="upload-field-title">
                            <h6>Upload PDF</h6>
                        </div>
                        <div class="custom-upload-field">
                            <div class="upload-pdf-icon">
                                <svg width="20" height="20" viewBox="0 0 20 20" fill="none" xmlns="http://www.w3.org/2000/svg">
        <path fill-rule="evenodd" clip-rule="evenodd" d="M5.12322 0H11.8099L17.477 5.90705V17.3963C17.477 18.8356 16.3126 20 14.8783 20H5.12322C3.68394 20 2.51953 18.8356 2.51953 17.3963V2.60369C2.51951 1.16441 3.68392 0 5.12322 0Z" fill="#E5252A"/>
        <path opacity="0.302" fill-rule="evenodd" clip-rule="evenodd" d="M11.8047 0V5.86207H17.4769L11.8047 0Z" fill="white"/>
        <path d="M5.41406 14.9225V11.2693H6.96829C7.3531 11.2693 7.65796 11.3742 7.88784 11.5891C8.11772 11.799 8.23267 12.0839 8.23267 12.4387C8.23267 12.7935 8.11772 13.0784 7.88784 13.2883C7.65796 13.5032 7.3531 13.6081 6.96829 13.6081H6.3486V14.9225H5.41406ZM6.3486 12.8135H6.86334C7.00326 12.8135 7.11321 12.7835 7.18819 12.7136C7.26314 12.6486 7.30314 12.5587 7.30314 12.4387C7.30314 12.3188 7.26316 12.2288 7.18819 12.1639C7.11324 12.0939 7.00329 12.0639 6.86334 12.0639H6.3486V12.8135ZM8.61746 14.9225V11.2693H9.91181C10.1667 11.2693 10.4066 11.3043 10.6314 11.3792C10.8563 11.4542 11.0612 11.5592 11.2411 11.7041C11.4211 11.844 11.566 12.0339 11.6709 12.2738C11.7709 12.5137 11.8259 12.7885 11.8259 13.0984C11.8259 13.4032 11.7709 13.6781 11.6709 13.918C11.566 14.1578 11.4211 14.3477 11.2411 14.4877C11.0612 14.6326 10.8563 14.7375 10.6314 14.8125C10.4066 14.8875 10.1667 14.9225 9.91181 14.9225H8.61746ZM9.532 14.1279H9.80186C9.94678 14.1279 10.0817 14.1129 10.2067 14.0779C10.3266 14.0429 10.4415 13.9879 10.5515 13.913C10.6564 13.838 10.7414 13.7331 10.8014 13.5931C10.8613 13.4532 10.8913 13.2883 10.8913 13.0984C10.8913 12.9035 10.8613 12.7386 10.8014 12.5986C10.7414 12.4587 10.6564 12.3538 10.5515 12.2788C10.4415 12.2038 10.3266 12.1489 10.2067 12.1139C10.0817 12.0789 9.94678 12.0639 9.80186 12.0639H9.532V14.1279ZM12.2956 14.9225V11.2693H14.8943V12.0639H13.2302V12.6486H14.5595V13.4382H13.2302V14.9225H12.2956Z" fill="white"/>
        </svg>

                            </div>
                            [file* file-481]
                        </div>
                    </div>
                </div>
                <div class="col-lg-12 mb-50">
                    <div class="form-check">
                        [acceptance your-consent] I have read & accepted Terms & Conditions. [/acceptance]
                    </div>
                </div>
                <div class="col-lg-12">
                    <div class="form-inner">
                        <button class="primary-btn1 btn-hover" type="submit">
                            Submit Now
                            <svg xmlns="http://www.w3.org/2000/svg" width="12" height="12" viewBox="0 0 12 12">
                                <path fill-rule="evenodd" clip-rule="evenodd" d="M10.1865 1.06237L0 11.2484L0.751627 12L10.9376 1.81347V8.85645H12V0H3.14355V1.06237H10.1865Z"></path>
                            </svg>
                            <span style="top: 60.5781px; left: 31.5938px;"></span>
                        </button>
                    </div>
                </div>
            </div>
Contact Form Home 4
                <div class="contact-form-area">
                <div class="section-title1 two white mb-40">
                    <h2>How can We Help You? Lest’s Connect With Us! </h2>
                </div>
                <div class="row">
                    <div class="col-lg-6 mb-30">
                        <div class="form-inner">
                            <label>Name* </label>
                           [text* name-123 placeholder "Daniel Scoot"]
                        </div>
                    </div>
                    <div class="col-lg-6 mb-30">
                        <div class="form-inner">
                            <label>Work Email* </label>
                           [email* email-148 placeholder "[email protected]"]
                        </div>
                    </div>
                    <div class="col-lg-6 mb-30">
                        <div class="form-inner">
                            <label>Company Name* </label>
                           [text* company placeholder "Consult Pro"]
                        </div>
                    </div>
                    <div class="col-lg-6 mb-30">
                        <div class="form-inner">
                            <label>Consulting Area* </label>
                           [text* consult placeholder "Dealership"]
                        </div>
                    </div>
                    <div class="col-lg-12 mb-15">
                        <div class="form-inner">
                            <label>Further Details* </label>
                           [textarea* details placeholder "What’s on your mind"]
                        </div>
                    </div>
                    <div class="col-lg-12 mb-50">
                        <div class="form-check">
                           [acceptance accept-this-1] Please save my name, email address for the next time I message with aploxn. [/acceptance]
                        </div>
                    </div>
                    <div class="col-lg-12">
                        <div class="form-inner">
                            <button class="explore-btn two btn-hover" type="submit">
                               Submit Now
                                <svg xmlns="http://www.w3.org/2000/svg" width="12" height="12" viewBox="0 0 12 12">
                                    <path fill-rule="evenodd" clip-rule="evenodd" d="M10.1865 1.06237L0 11.2484L0.751627 12L10.9376 1.81347V8.85645H12V0H3.14355V1.06237H10.1865Z"> </path>
                                </svg>
                                <span style="top: -9.70312px; left: 99.1719px;"> </span>
                            </button>
                        </div>
                    </div>
                </div>
            </div>
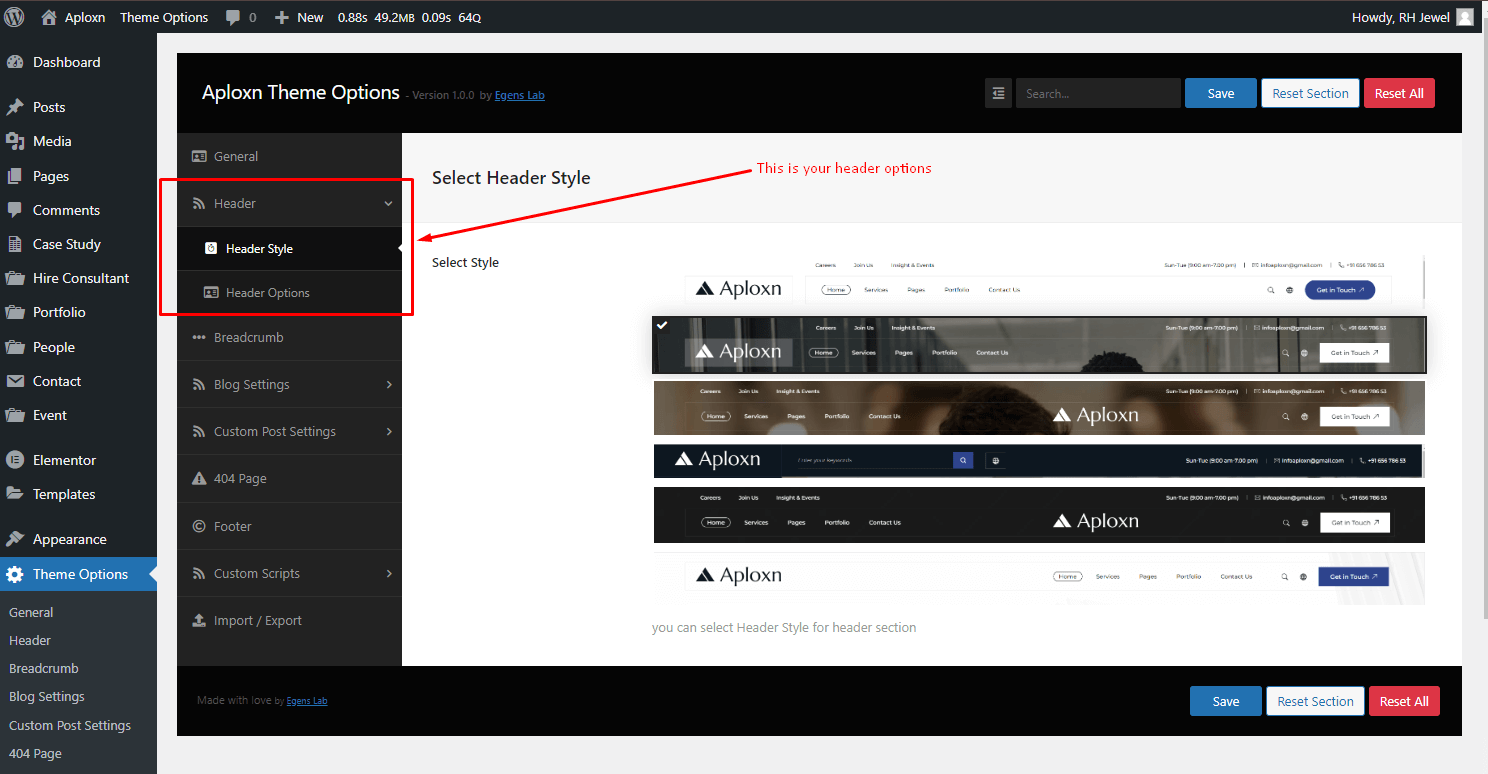
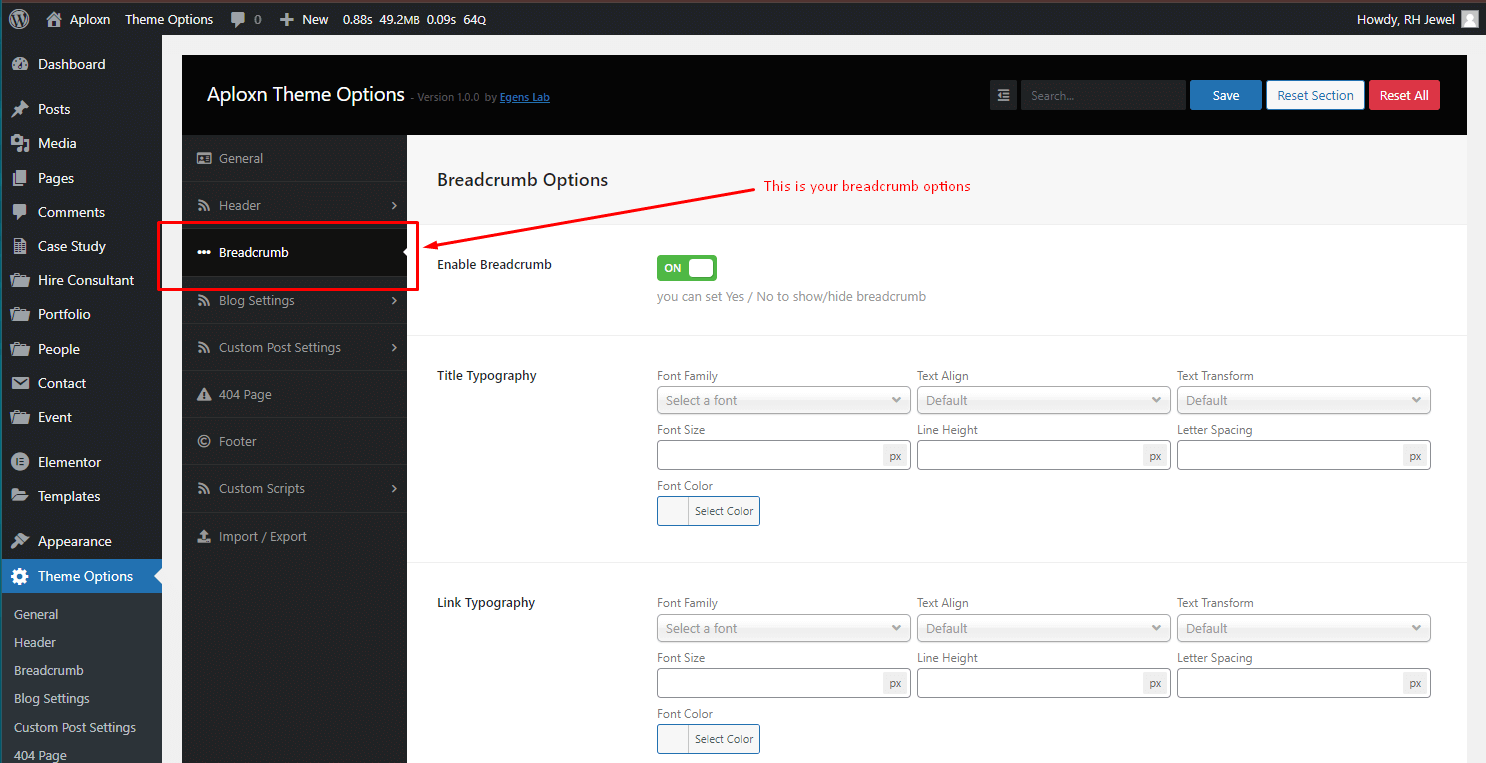
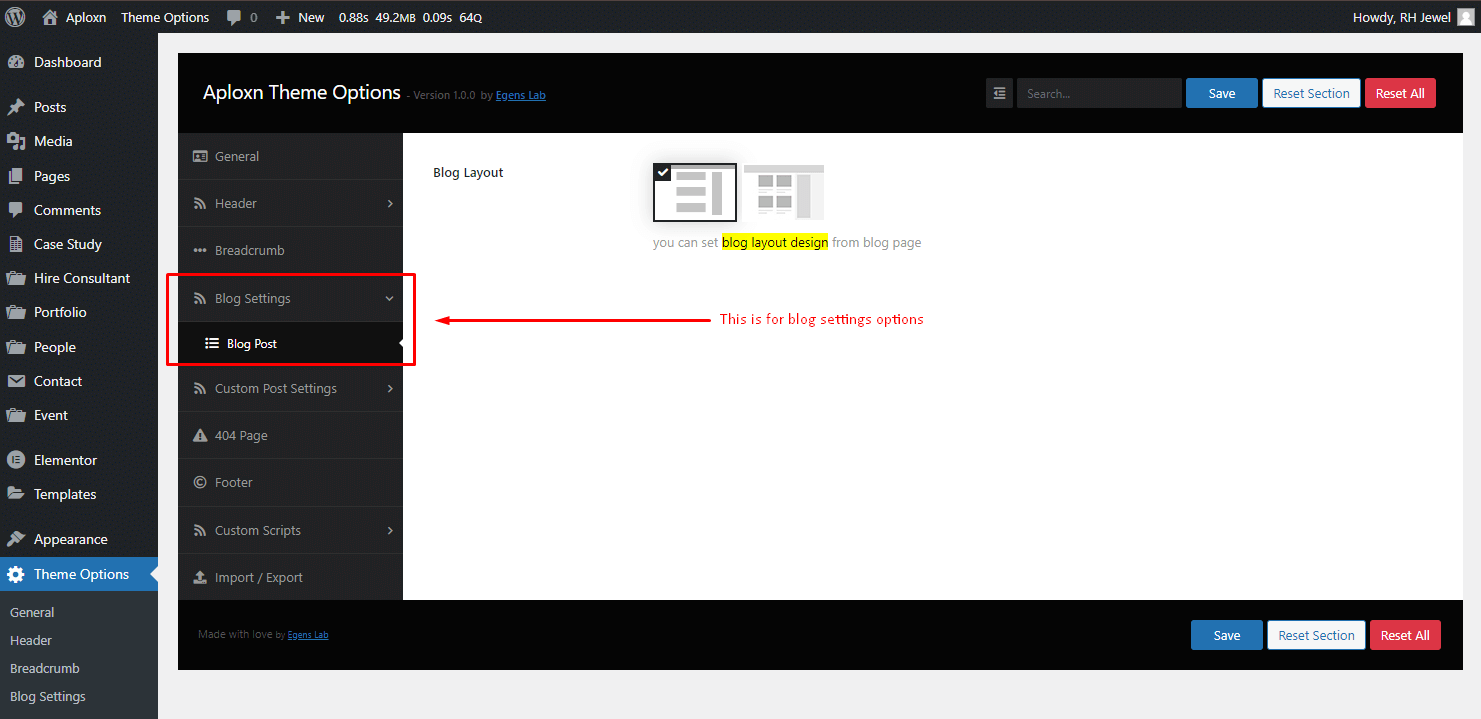
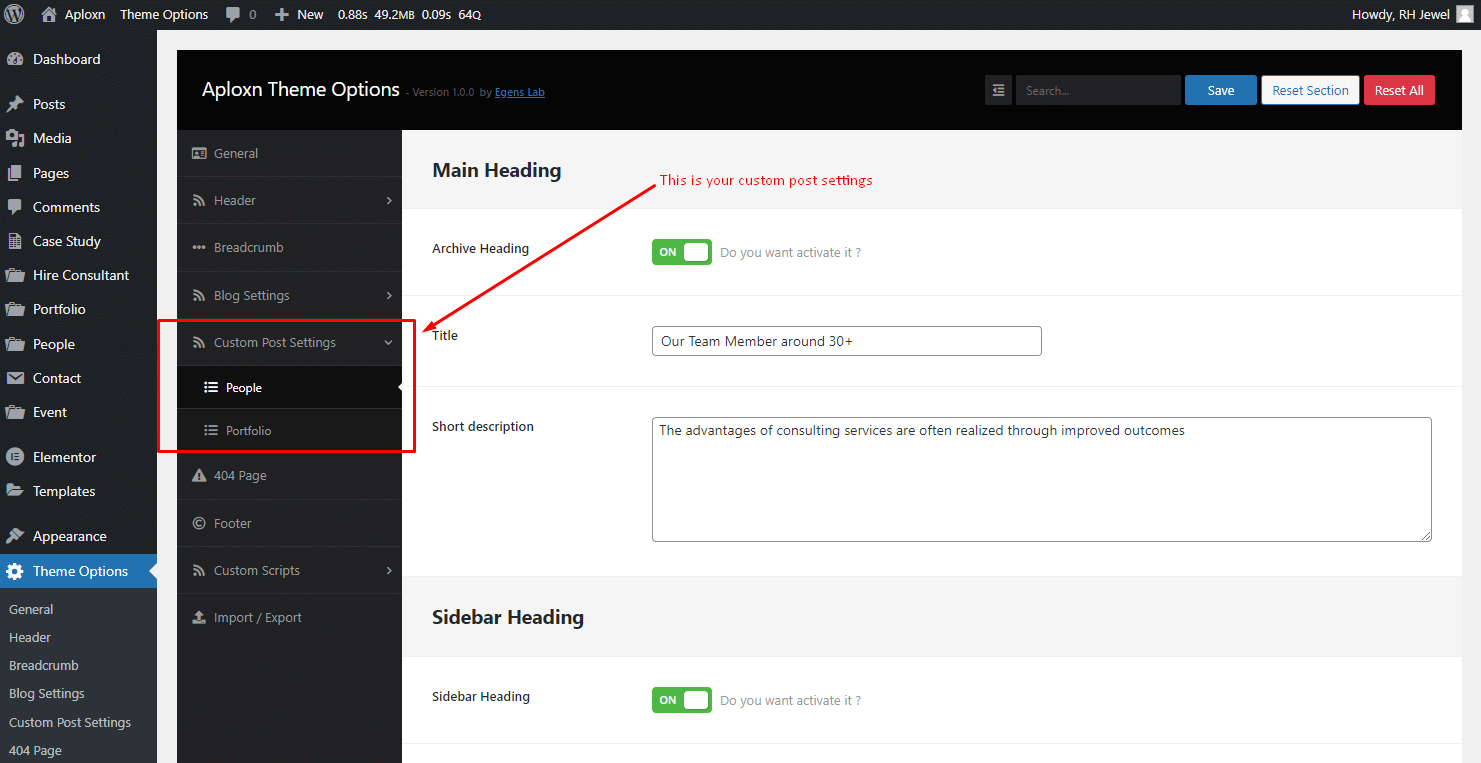
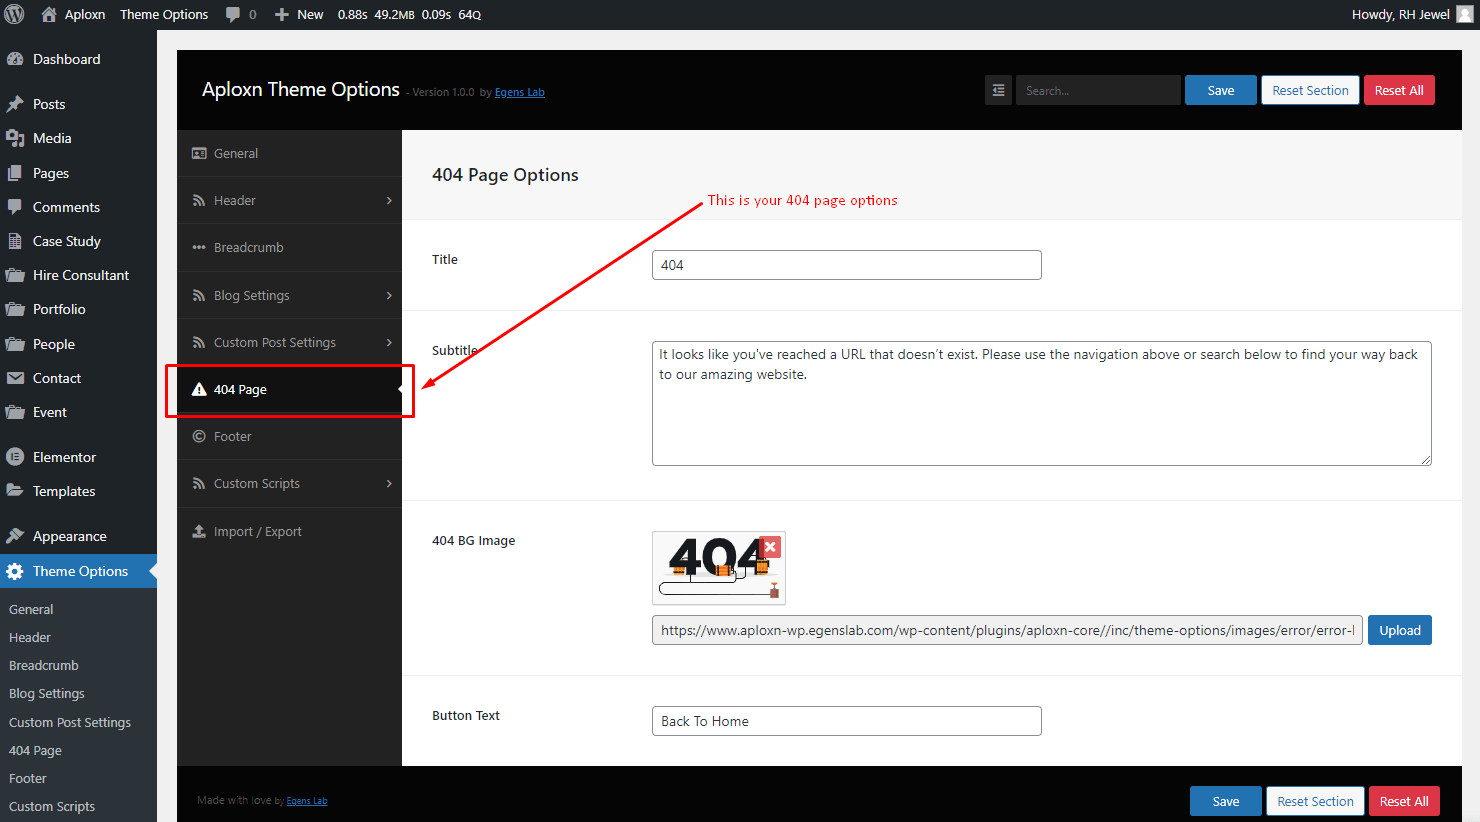
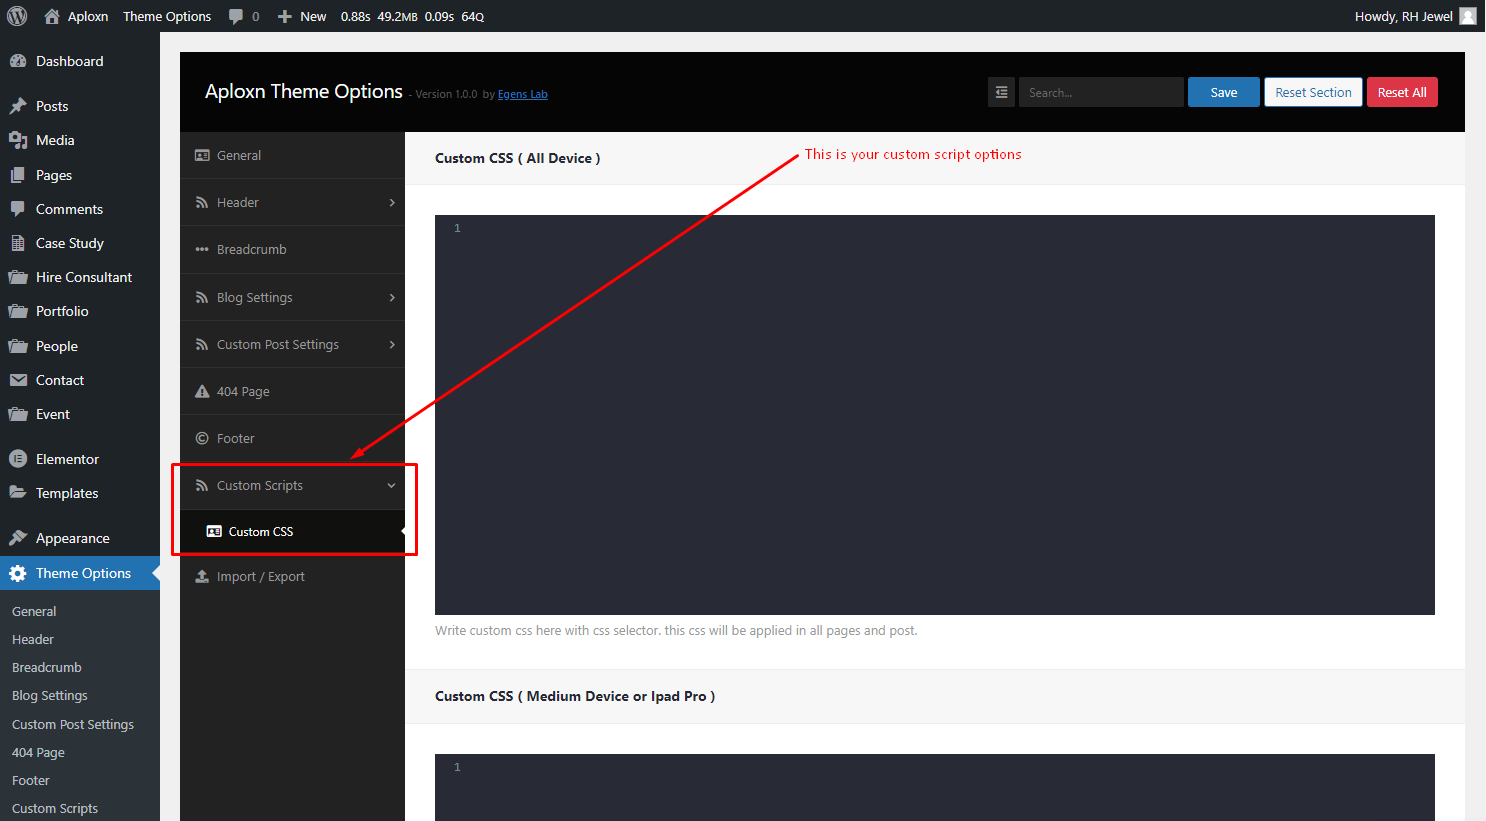
Theme Options Panel
Follow these screenshot to change your theme layout from Theme Options

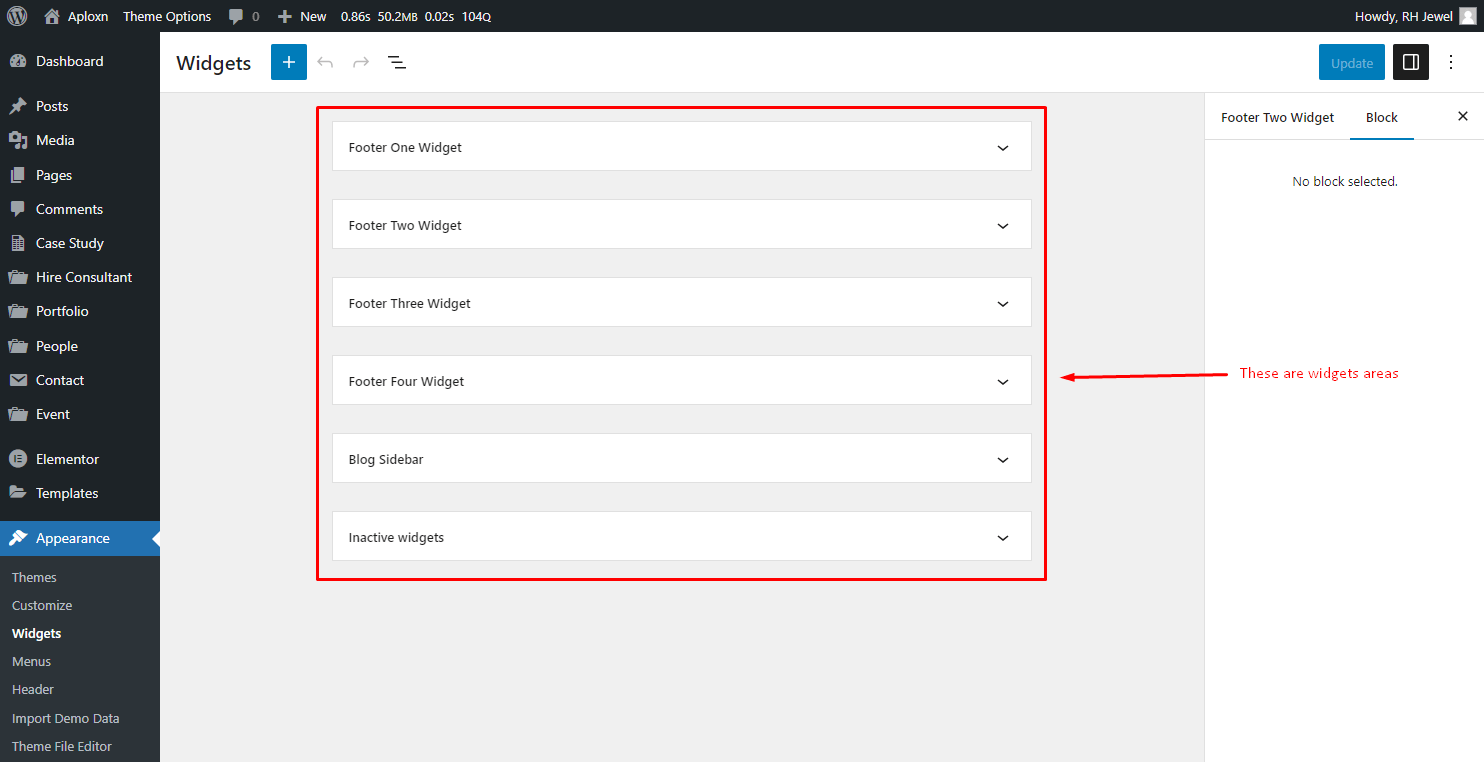
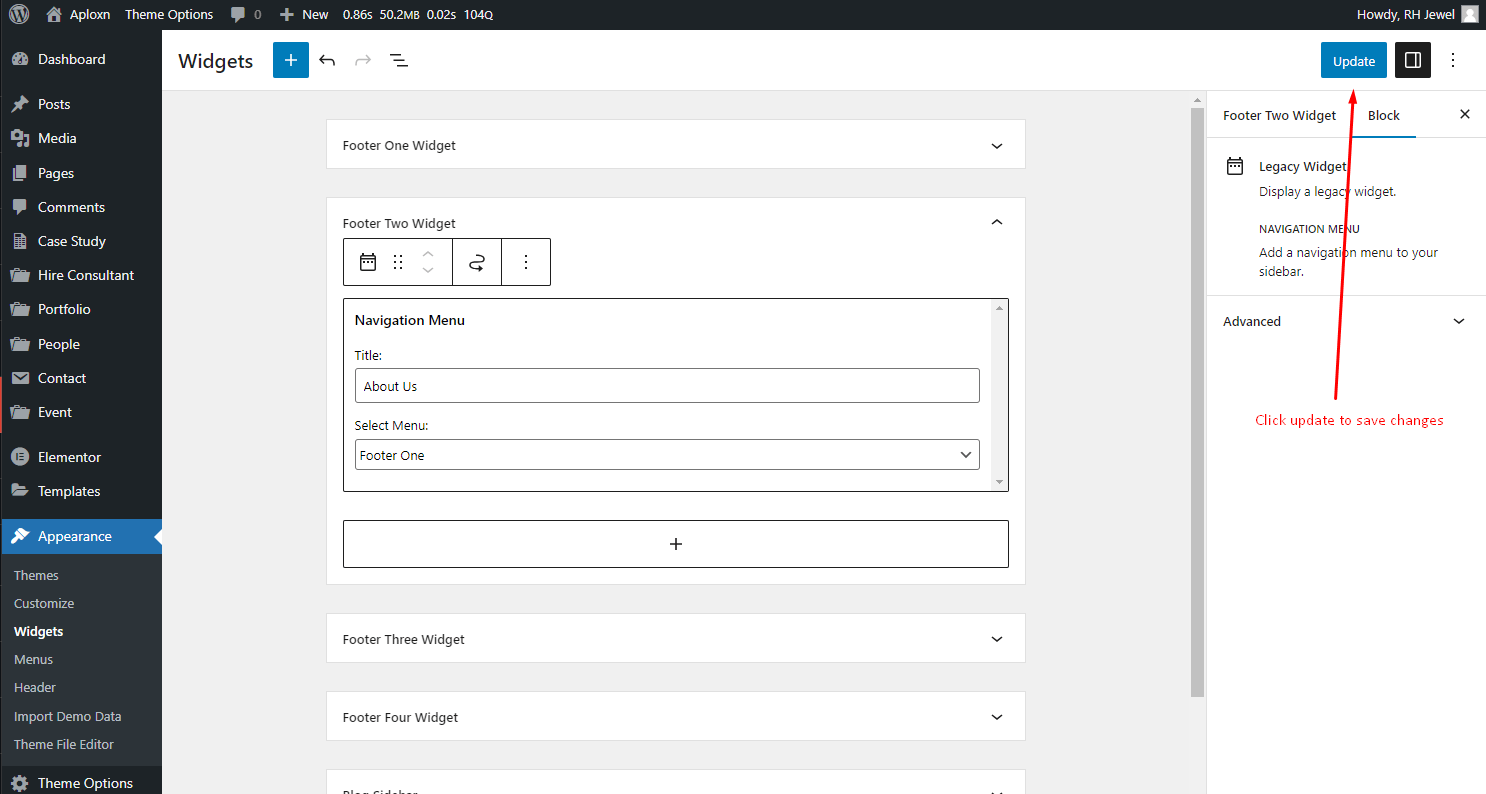
How to add widgets
Step 1: Navigate Appearance > Widgets.
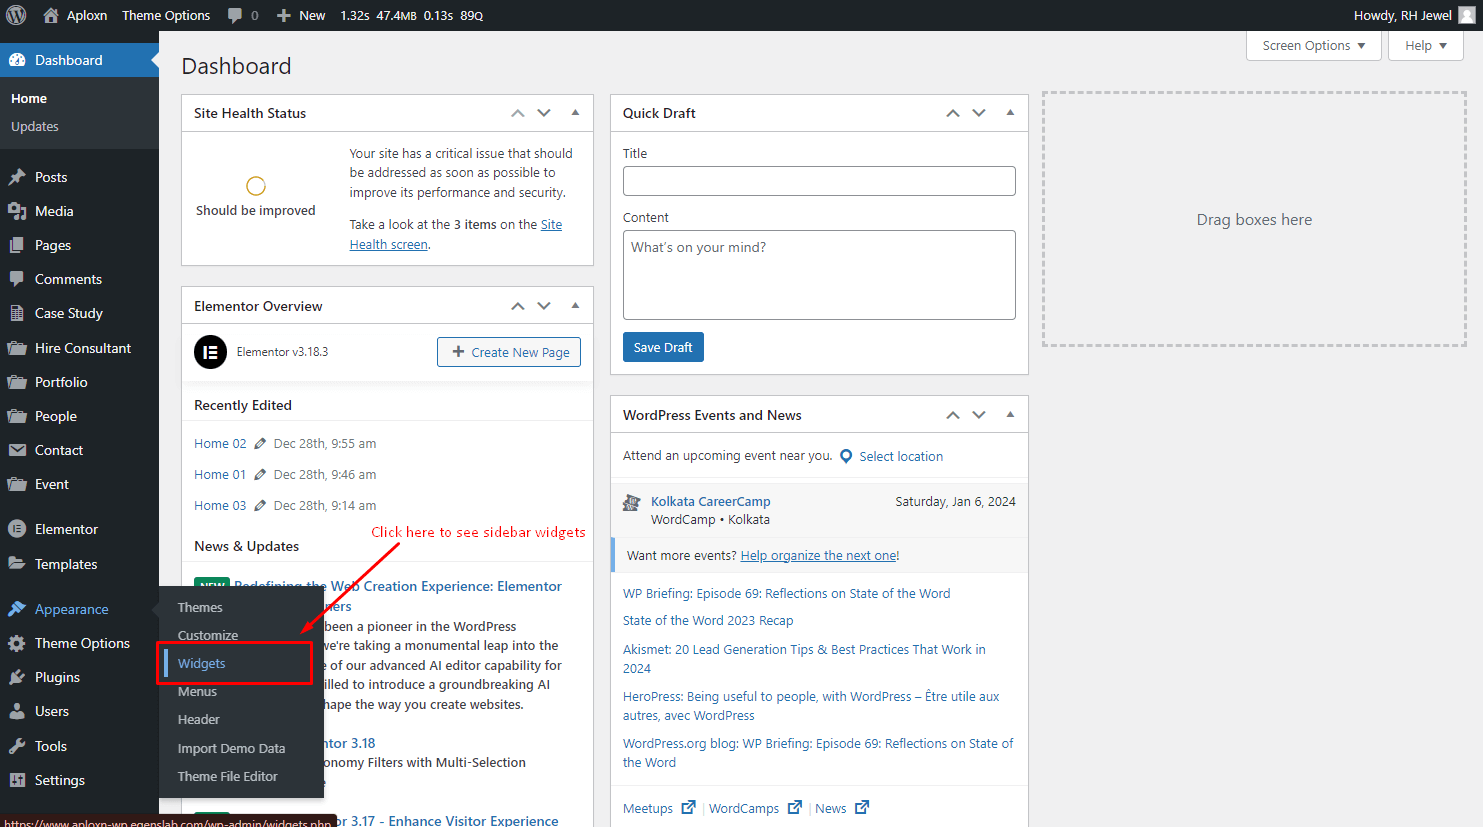
Step 2: You can see all the widget areas here.
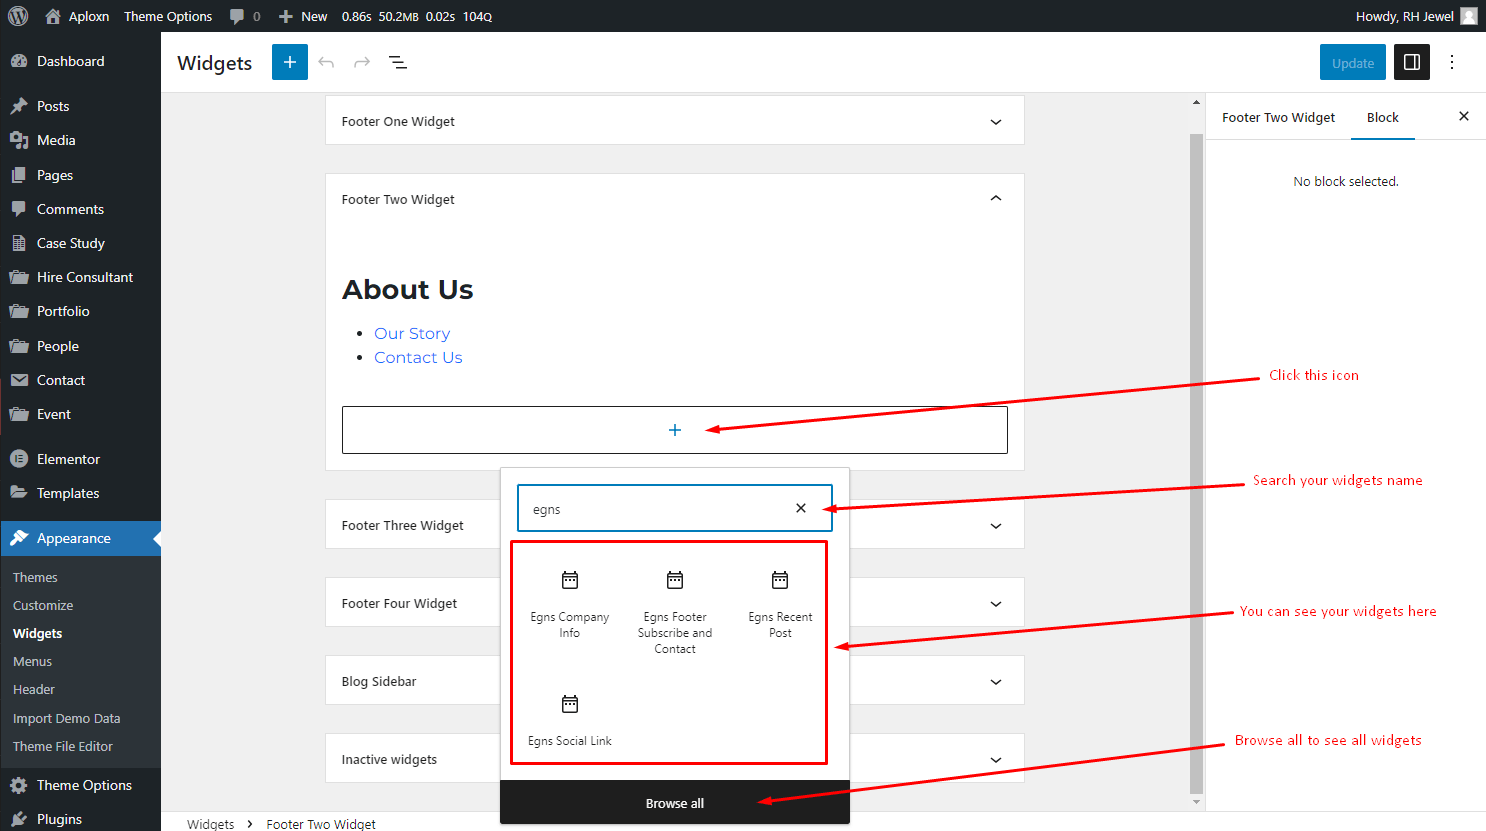
How to edit a widget
Step 3: Click on Plus icon and search widgets name like, 'egns' to see all custom widget.
Step 4: Click on widget to edit them.
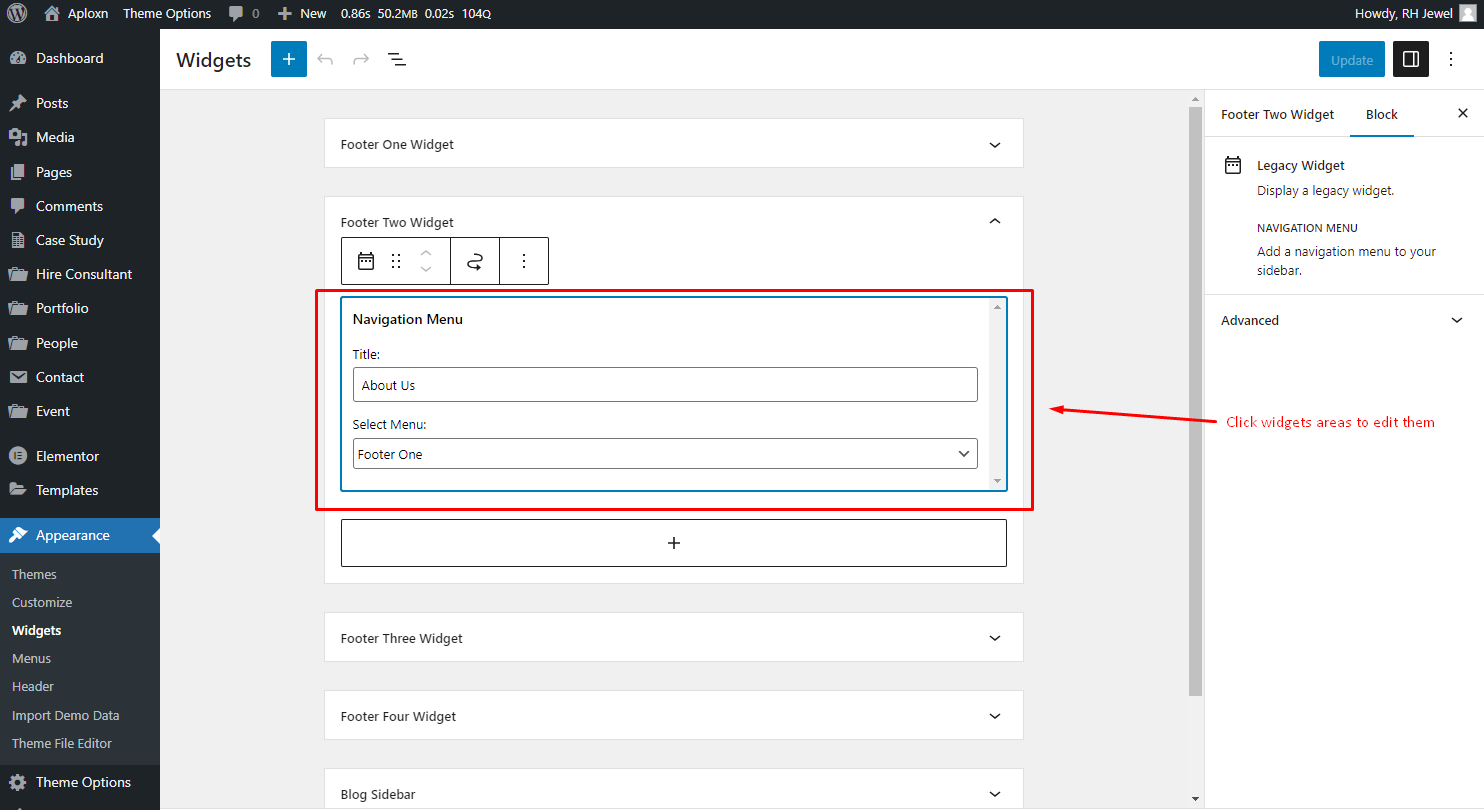
Step 5: When you click on widget an edit form will appear.
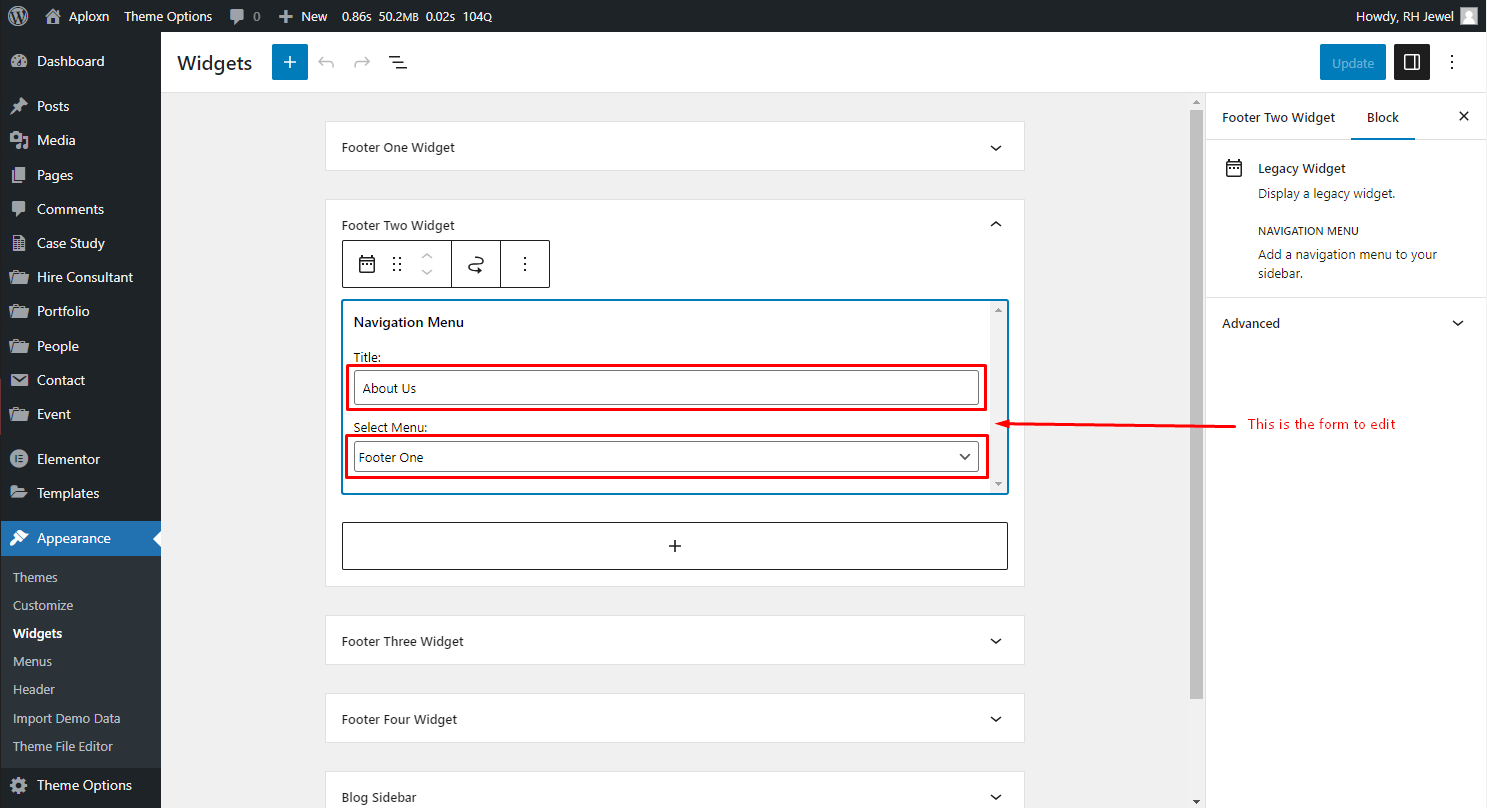
Step 6: After editing, click Update to save changes.
Theme Update Tutorial
There are two ways to update the theme. The regular and the automatic way.
Automatic
This is the easiest way to update a theme. You can do that by Envato Market Plugin. We already included this plugin with our theme. You need to install and activate the plugin and configure it with your themeforest profile. For configuring this plugin follow this tutorial article: http://www.wpexplorer.com/envato-market-plugin-guide/.
Manual
Go to your "Themeforest Download Account" and download the latest package. Unzip it and overwrite the theme folder on your server via a FTP Client.
Plugins
If the theme uses plugins and there are updates available for theme, you should see a notification and be able to easily install theme.However if you don't see the notification bar, you can update the plugins manually as well.
Plugins
Following list of packages will be included:
- Elementor Page Builder
- Aploxn Core
- Contact Form 7
- MC4WP: Mailchimp for WordPress
- One Click Demo Import
- SVG Support
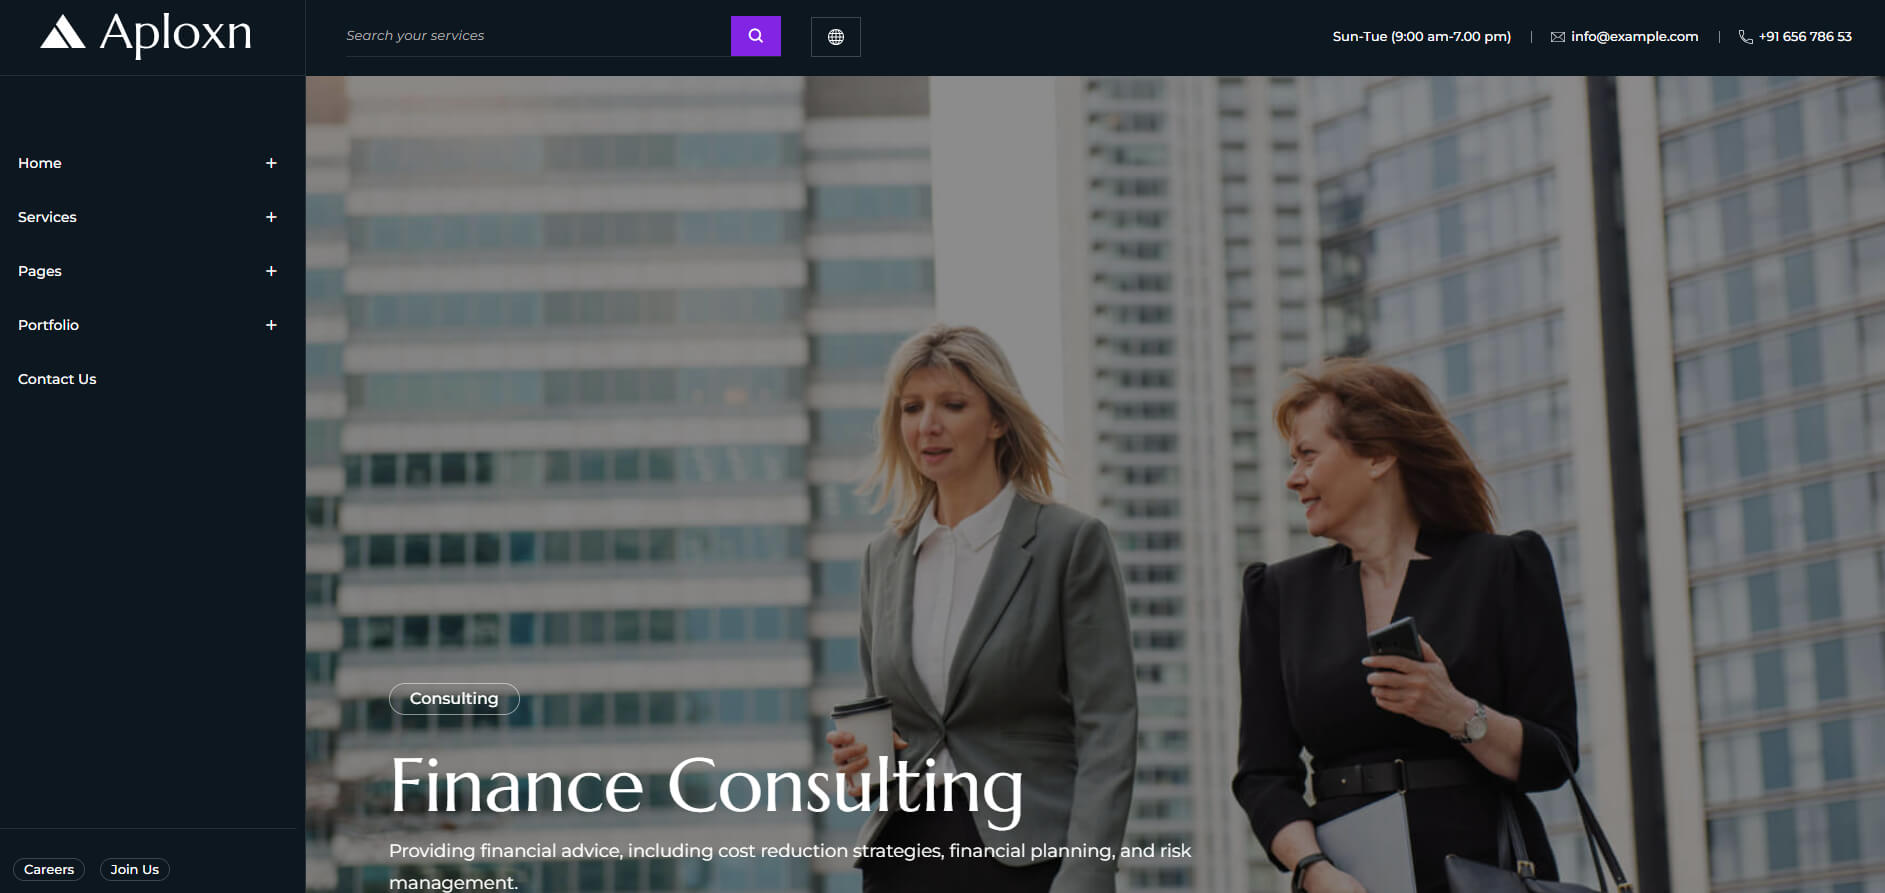
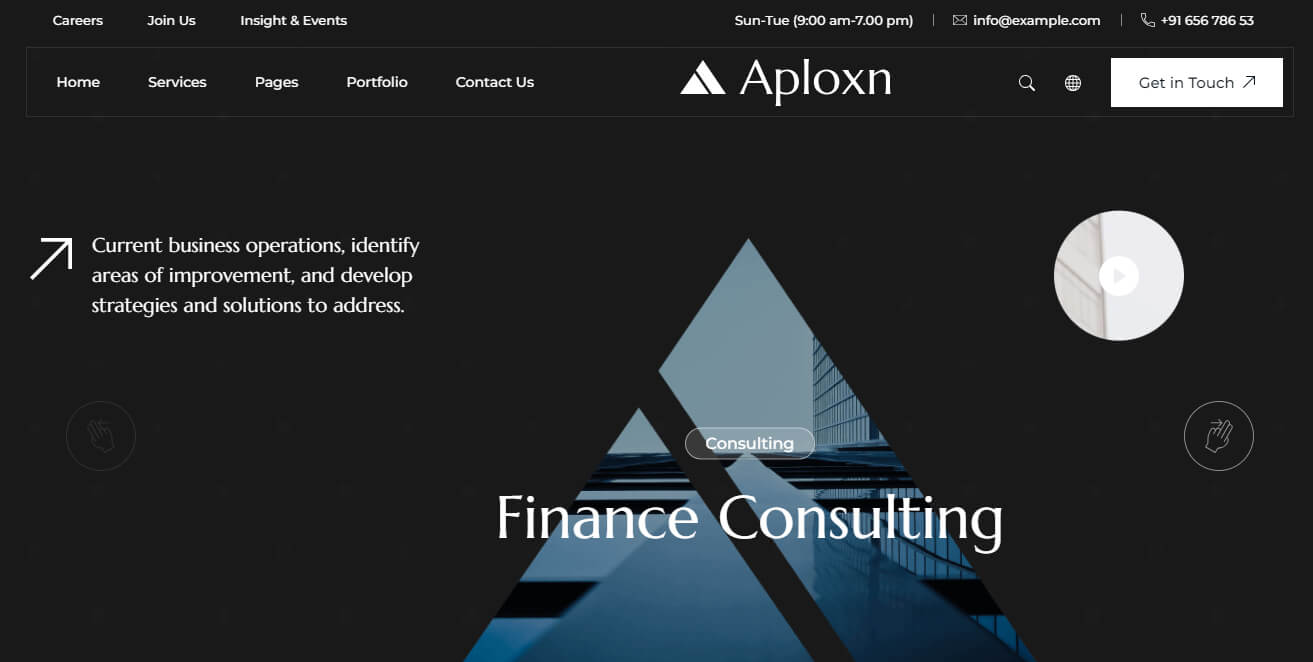
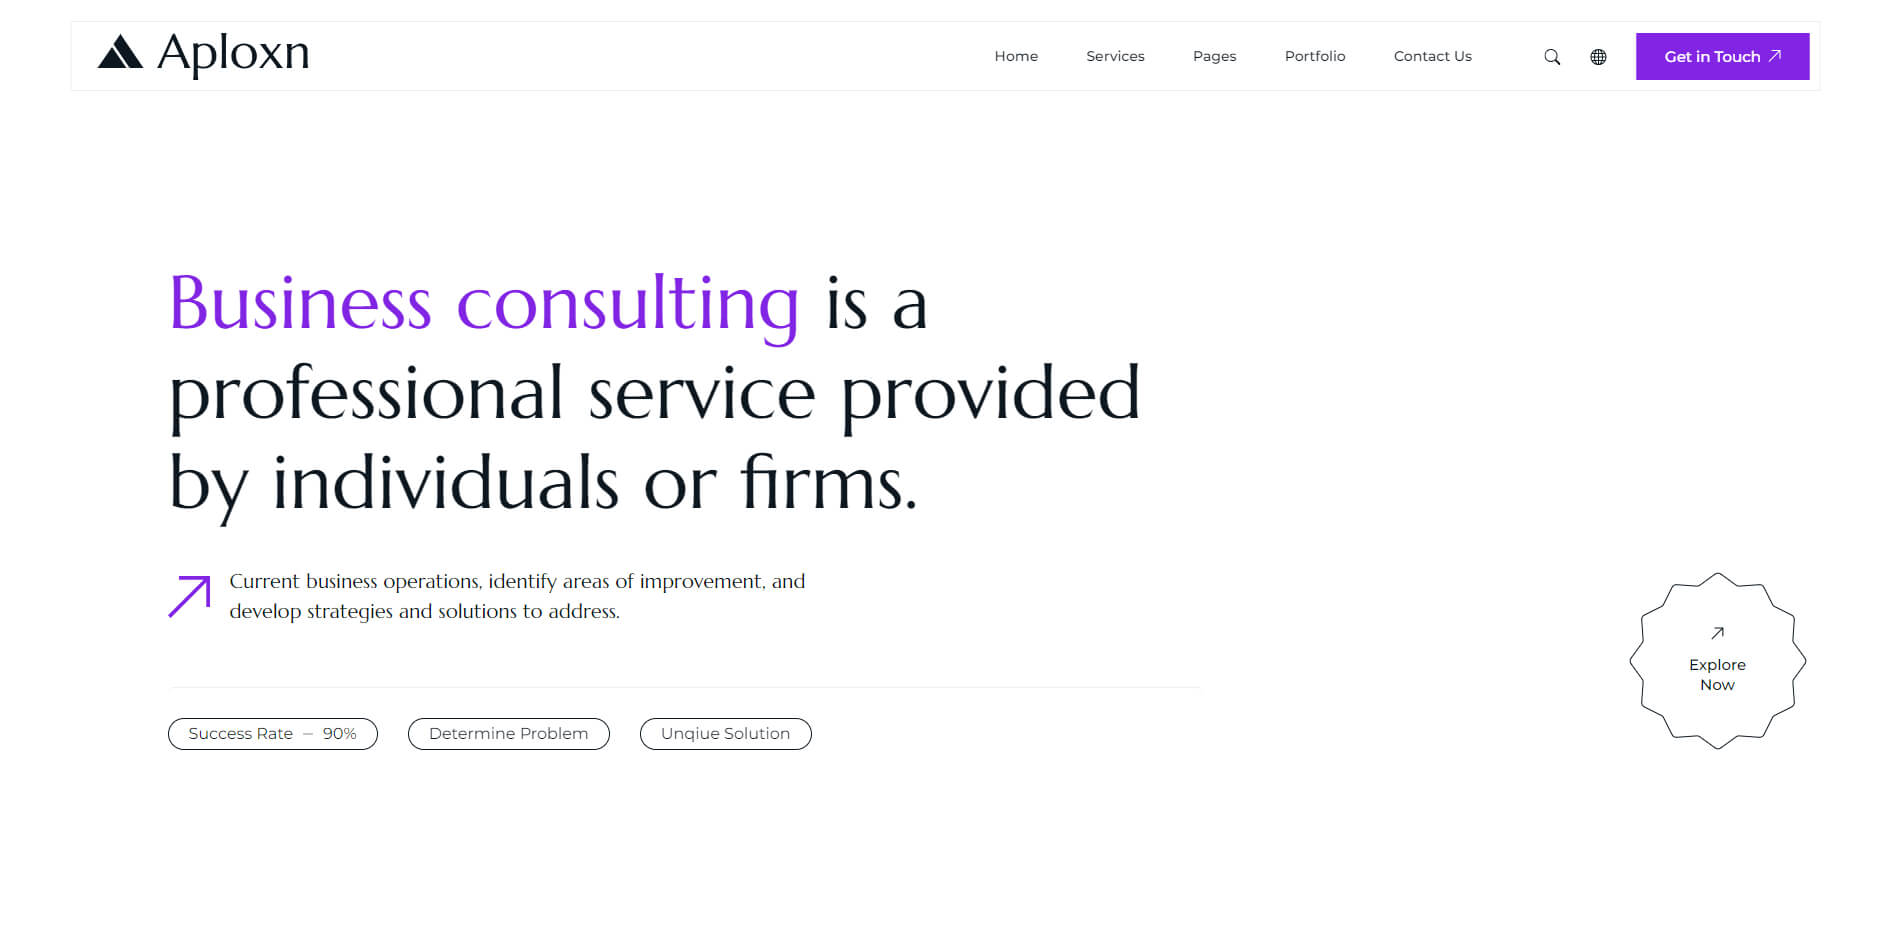
Home Page Demos


Source & Credits
Images:
- Unsplash - https://unsplash.com/
Icons:
- Icons Font Face - https://icons.getbootstrap.com
- Icons Font Face - https://boxicons.com
Scripts:
- jQuery - http://www.jquery.com/
- Bootstrap 5 - http://getbootstrap.com/
- swiperjs - https://swiperjs.com/get-started
- Magnific Popup - https://dimsemenov.com/plugins/magnific-popup
Support
If this documentation doesn't answer your questions, So, Please send us Email via Item Support Page
We are located in GMT +5:30 time zone and we answer all questions within 12-24 hours in weekdays. In some rare cases the waiting time can be to 48 hours. (except holiday seasons which might take longer).
Don’t forget to Rate this template
Go to your Themeforest Profile > Downloads Tab > & then You can Rate & Review for our template.
Thank You.
More Templates
Checkout Our Premium Templates Below